Chapter 8: Form Formalities
In the previous chapter, we learned how to have Kitura display standard web pages via its templating system. In this chapter, we’ll use that knowledge to show some pages with forms on them, then demonstrate how to use Kitura to accept and act upon data from a form after the user submits it.
Web Forms: A Review
Before we start looking at the Kitura side of things, let’s do a quick review of how forms work in browsers. (But if you’re already pretty well informed on this stuff and find yourself getting bored, feel free to skip ahead to the next section.)
The HTML <form> tag has an action attribute which contains the address that the browser will contact when the form is submitted. It also has an attribute called method which can have a value of either get or post.
If method is set to get, then when the form is submitted, the browser will encode the names and values of the form’s fields and append them to the end of the address in the action attribute. It will then make an HTTP GET request to that address, and the request will have an empty body.
For example, given the following HTML:
<form method="get" action="/foo">
  <label>Search for: <input type="text" name="searchQuery" /></label><br />
  Media types:<br />
  <label><input type="checkbox" name="mediaType" value="text" />Text</label><br />
  <label><input type="checkbox" name="mediaType" value="audio" />Audio</label><br />
  <label><input type="checkbox" name="mediaType" value="video" />Video</label><br />
  <input type="submit" />
</form>
The browser will create a form which looks something like this.
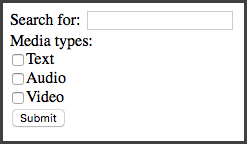
Now let’s say we enter “Kitura” in the “Search for” field, check the “Text” checkbox, and then click the “Submit” button. The browser will build a query which looks something like:
http://example.com/foo?searchQuery=Kitura&mediaType=text
See how the name attributes of the <input> elements were combined with the values entered or selected by the user to build the URL?
So what happens if we go back to our form and change the method attribute of the <form> to post?
<form method="post" action="/foo">
  …
When this form is submitted via an HTTP POST query, the browser will not put the form values in the URL. That means, if this page appears at the URL “http://example.com/“, the user will just be sent to “http://example.com/foo” no matter what values they enter or select in the form. The browser will, however, still serialize the data and send it as the body of the HTML request. This point is important because it means that the URLs created via forms that submit via GET are “bookmarkable” in the sense that, after submitting the from, if you add the resulting page to your browser’s bookmarks/favorites/hotlist and then revisit it later, you will see the same results of your submission. You could also share the URL with friends or family via email or text message or the like and know that, when they click on the web address, they will see the same results page that you did. This handy property does not hold true for results pages reached by a form that submits via POST; again, for our example form above, no matter what the user selects, the address of the resulting page will always be “http://example.com/foo”.
So if forms submitted by GET have this handy “bookmarkable” property, why aren’t all forms submitted by GET? Well, there are a couple of reasons why we’d still want to use POST for some forms. For example, there may be cases where we don’t want to have the form values inside the URL; for example, for a form a user would use to log in to a site that would have a password field. We don’t want that sensitive password to be sticking around in a URL for anyone to see or get access to! Also, note that browsers have a finite limit to the length of a URL that it will support. The limit varies by browser, but just as a rule of thumb, if there’s a chance someone could enter an arbitrarily large amount of data into your form - for example, if it has a <textarea> element for entering a large amount of text, a file upload field (an <input> tag with a type attribute of file), or just lots and lots of standard text fields - it’s best to have your form submit via POST rather than GET.
So when a POST request is done, as mentioned above, the form data is serialized into the body of a POST request to the server. There are two common methods by which this is done, and the method can be changed by setting an enctype value on the <form> tab. The default method used when an enctype is not present (as on our form above) is application/x-www-form-urlencoded, but the other common method is multipart/form-data. I won’t go into detail about how either of these work under the hood, but suffice it to say that if your form has a file upload field, you must set enctype to multipart/form-data. Otherwise, it’s safe to just let the browser use the default behavior by omitting the enctype attribute (which will cause it to use application/x-www-form-urlencoded by default).
So, to sum it up:
<form method="get">- Will create a “bookmarkable” URL
- Should not be used with
<textarea>or<input type="file"> - Should never be used on forms with fields for passwords or other sensitive information
- Should not be used on forms with many elements
<form method="post">- Will not create a “bookmarkable” URL
- Can be used with large forms or forms with
<textarea>elements - Should be used with forms with field for passwords or other sensitive information
- Cannot be used with
<input type="file">
<form method="post" enctype="multipart/form-data">- As above, except can be used with
<input type="file">
- As above, except can be used with
Handling GET Submissions
All right, let’s get to coding. Start a new Kitura project. (We’ve been playing with that Chinook database project for a while, so if you’ve forgotten how to start a new one, feel free to go back and take a peek at chapter 1.)
In your Package.swift, import Kitura and KituraStencil. Let’s start by creating a route at the base path which just shows a template.
import Kitura
import KituraStencil

let router = Router()

router.setDefault(templateEngine: StencilTemplateEngine())

router.get("/") { _, response, next in
    try response.render("index", context: [:])
    next()
}

Kitura.addHTTPServer(onPort: 8080, with: router)
Kitura.run()
Create your Views directory and add an index.stencil which looks like the following. Part of it will look very familiar.
<!DOCTYPE html>
<html>
  <head>
    <title>Search Page</title>
  </head>
  <body>
    <form method="get" action="/search">
      <label>Search for: <input type="text" name="searchQuery" /></label><br />
      Media types:<br />
      <label><input type="checkbox" name="mediaType" value="text" />Text</label><br />
      <label><input type="checkbox" name="mediaType" value="audio" />Audio</label><br />
      <label><input type="checkbox" name="mediaType" value="video" />Video</label><br />
      <input type="submit" />
    </form>
  </body>
</html>
Note that our form is going to submit via GET in this case.
We now want to build a route handler to handle the form submission. So how do we find those values? Well, I actually already mentioned how in this book, way back in chapter 2. Remember? You can find them in the queryParameters property of the RouterRequest object. Try adding this to your project.
router.get("/search") { request, response, next in
    guard let query = request.queryParameters["searchQuery"] else {
        response.send("Please enter a search term.")
        return
    }
    guard let mediaType = request.queryParameters["mediaType"] else {
        response.send("Please select at least one media type.")
        return
    }
    response.send("You searched for \(query) in the \(mediaType) type! Here's some results.")
    next()
}
Now load up the search form page and play around a bit.
You might notice a quirk if you select more than one of the “Media types” checkboxes. The resulting URL will look something like this:
http://localhost:8080/search?searchQuery=Kitura&mediaType=text&mediaType=audio
Note there are two values associated with the mediaType key. The text will look something like this:
You searched for Kitura in the text,audio type! Here's some results.
Yes, when there are more than one values for a key in a query, Kitura concatenates the values with a comma in order that they all fit into a single string. To work around this and get the individual values in these cases where there might be multiples, we need to split the value that Kitura gives us on the comma character. (I think this is silly - what happens if one of the values itself has a comma? - and have submitted a pull request to the Kitura project to rectify this. The pull request was accepted, but the changes have not yet appeared in a Kitura release as of this writing.) Let’s update our handler to deal with this.
router.get("/search") { request, response, next in
    guard let query = request.queryParameters["searchQuery"] else {
        response.send("Please enter a search term.")
        return
    }
    guard let mediaType = request.queryParameters["mediaType"] else {
        response.send("Please select at least one media type.")
        return
    }
    let separateMediaTypes = mediaType.split(separator: ",")
    for type in separateMediaTypes {
        response.send("Here are \(query) results in the \(type) media type.\n")
    }
    next()
}
And the result:
Here are Kitura results in the text media type.
Here are Kitura results in the audio media type.
That’s better.
Handling POST Submissions
POST Submissions with enctype="application/x-www-form-urlencoded"
For this sort of form, it would probably be best to keep it as a GET form, since it’s fairly simple and we don’t mind if the results page is bookmarkable. But we’ll turn it into a POST form just so we can see how they would work.
Now that you got this far, handling a POST submission done with the default application/x-www-form-urlencoded encoding is simple. Start by opening up your index.stencil and changing the method attribute of the <form> tag to post and save.
When we expect an HTTP request to have a body we want to deal with, we want to add an instance of the BodyParser class to the relevant route as middleware. After doing that, we can access that data in the body parameter of the RouterRequest object. That parameter is a instance of the ParsedBody enum which has cases and computed property corresponding to the type of content in the body. The one we’re interested in here is the asURLEncoded parameter which returns an optional [String: String] dictionary. No worries if this all sounds like word salad; it’s simpler than it sounds. Let’s go to the code.
router.post("/search", middleware: BodyParser())
router.post("/search") { request, response, next in
    guard let postValues = request.body?.asURLEncoded else {
        response.send("That shouldn't have happened.")
        return
    }
    guard let query = postValues["searchQuery"] else {
        response.send("Please enter a search term.")
        return
    }
    guard let mediaType = postValues["mediaType"] else {
        response.send("Please select at least one media type.")
        return
    }
    let separateMediaTypes = mediaType.split(separator: ",")
    for type in separateMediaTypes {
        response.send("Here are \(query) results in the \(type) media type.\n")
    }
    next()
}
So note in that first line where we instantiate the BodyParser class and add it to handle POST requests made to the “/search” path. Yes, this is the same path we used in the code to handle GET requests above. Remember from Chapter 2 that Kitura lets us define different handlers for the same route segregated by the HTTP request method; the code we wrote above to handle GET requests won’t run when a POST request is made to “/search”, and vice versa. Also recall that we can omit a path when defining middleware or other route handlers, so what I often like to do is just have BodyParser kick into action on all POST requests, regardless of path, by doing:
router.post(middleware: BodyParser())
Though whether you’d like to take this approach is up to you. (If you ever try to write a POST handler and get confused why request.body is empty, odds are the problem is that you forgot to add this middleware. This has happened to me more times than I’d like to admit.)
Inside the standard request handler, we have:
guard let postValues = request.body?.asURLEncoded else {
Here’s another quirk of Swift, specifically with the handling of optionals. Going into all the quirks of Swift optionals is outside the scope of this book, but suffice it to say that it’s something which often confuses new Swift developers - it sure confused me! The short of it here is that both the body property and the asURLEncoded property of the body property are optionals. The question mark after the body part means that the Swift compiler will check to make sure that body itself is not nil before it attempts to resolve its asURLEncoded property; if body is nil, it just sends nil down the line to postValues rather than trying to continue. The short of the short of it is that postValues will be nil if either request.body or request.body.asURLEncoded are nil.
Note that, just as with queryParameters, in the case that there are multiple values for one key in the data, those values will be concatenated with commas, so we do the same splitting as we do in our GET submission code.
Go ahead and build your project and test it out. You should see that the behavior is exactly the same as it was when you were making GET requests, except that the path won’t have the query string.
POST Submisssions with enctype="multipart/form-data"
Okay, let’s round out the trifecta by seeing how we’d take a form submission with the multipart/form-data encoding. Let’s tweak our template again to add the enctype attribute, and change the action path to something else while we’re at it. We’ll also change the action path to something else.
    <form method="post" action="/multipart" enctype="multipart/form-data">
      <label>Search for: <input type="text" name="searchQuery" /></label><br />
      Media types:<br />
      <label><input type="checkbox" name="mediaType" value="text" />Text</label><br />
      <label><input type="checkbox" name="mediaType" value="audio" />Audio</label><br />
      <label><input type="checkbox" name="mediaType" value="video" />Video</label><br />
      <label>A picture of something silly: <input type="file" name="sillyPicture" /></label><br />
      <input type="submit" />
    </form>
Now our router handler is going to be quite a bit different than the two cases above. We’re going to find our values in request.body?.asMultiPart, and it’s going to be an array of Part structs. Each struct will have a name property which corresponds to the name of our field in the HTML form, and a body property which contains the value the user entered as a ParsedBody enum. Most interesting for the case of file fields, there’s also a filename property which will contain the filename of an uploaded file (for other fields, it will be a blank String), and a type property which corresponds to the MIME type of the uploaded file. For example, if the file uploaded was a JPEG-formatted picture, it will be image/jpeg. (For non-file fields, this will be text/plain.)
So what we’ll do is loop through the parts and examine the name parameters to make sure all the parts we want can be found. We’ll use a switch case on the body parameters of the parts, which, recall, is a ParsedBody enum, even though (due to Swift quirkiness) we haven’t used it as one yet. You’ll see that this all makes the code quite a bit more verbose; another reason why you may wish to avoid using mutlipart/form-data-encoded forms when it’s not necessary (when there’s no file upload field).
router.post("/multipart", middleware: BodyParser())
router.post("/multipart") { request, response, next in
    guard let postValues = request.body?.asMultiPart else {
        response.send("That was unexpected.")
        return
    }
    var mediaTypes: [String] = []
    var searchQuery: String?
    var sillyPicture: Data?
    for part in postValues {
        switch part.body {
        case .text(let text):
            if part.name == "mediaType" {
                mediaTypes.append(text)
            }
            else if part.name == "searchQuery" {
                searchQuery = text
            }
        case .raw(let data):
            if part.name == "sillyPicture" {
                sillyPicture = data
            }
        default:
            response.send("Unexpected part type.")
        }
    }
    guard let _ = searchQuery else {
        response.send("Please enter a search term.")
        return
    }
    guard mediaTypes.isEmpty == false else {
        response.send("Please select at least one media type.")
        return
    }
    guard let _ = sillyPicture else {
        response.send("Please upload a silly picture.")
        return
    }
    for type in mediaTypes {
        response.send("Here are \(searchQuery!) results in the \(type) media type.\n")
    }
    // Do something interesting with the sillyPicture here…
    next()
}
Extra Credit
Want an extra challenge? Now that you know how forms work, go back and open up your music database project from previous chapters and add a search page allowing users to search for albums, artists, and songs by name. This will involve using the form handling stuff introduced in this chapter plus the templating and Kuery stuff from earlier chapters, so it should be a good demonstration of all the fun stuff you’ve learned so far. Have fun!